Sunday 30 November 2014

Cape!!!

I was going to post all my recent makes in order, but I just can't wait to share this make with you.


As the weather got colder I knew I'd need a warmer coat than the lightweight mac I'd worn through spring. I have a winter coat but it's not a great fit (my back is too broad - ha!) and it's black, which I've tried to limit from my wardrobe as much as I can.

I needed a coat and I wasn't willing to buy one. I've had this cape idea for a while, buying the wool back in London in July especially for it.

This project has done me the world of good. I took my time throughout, made the effort to practice unfamiliar techniques and fabrics and ended up with an item that I love and should I make it again I wouldn't do a single thing differently.


I have literally waited a month for the right day to take these photos as anyone in the UK will tell you we pretty much skipped Autumn. The weather has been constantly "mild" (read cloudy and boring) and all those sunny Autumn mornings I love so much just never came and now it's practically winter. This morning the sun shone through the window so I grabbed the tripod and dashed to the park just hoping there were still some Autumnal colours around. There were, but they were all on the floor. Good enough.

Guys, you all need to go and make a cape right now, and I'll tell you why:
  • It's so damn comfortable. You know how you feel a little restricted in your coat with the arms? Imagine a circle skirt for your upper body. The freedom is beautiful! I thought it would be restrictive but I took care to place the armholes so that I comfortably carry a handbag on my elbow or let the arms hang loose. I have total movement and don't feel suffocated the way I have in a coat.
  • Because of the room, you can wear your comfiest, thickest jumpers underneath it. In fact this is sometimes essential as your arms don't have any, well, sleeves. 
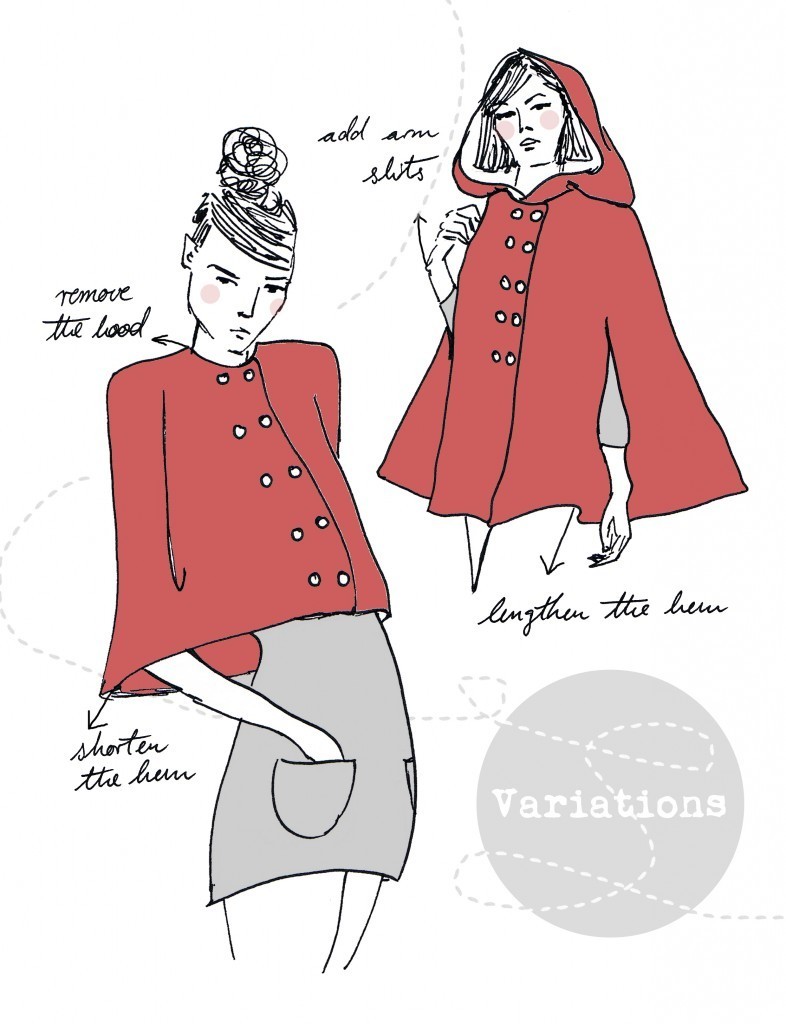
  • It's easier than sewing a coat. Seriously, the pattern is a half circle with darts to form the shoulders. That's it. From there you can customise as you like, add a hood, add a collar, add buttonholes or a ribbon tie, add arm slits, pockets, whatever the hell you want.
  • It looks good with a snood. See? - (I did make the snood, but for some reason I've never thought to blog about knitted makes. Perhaps I should?)
  • ...And these awesome vintage (1950s I believe) green gloves I found in The Real McCoys in Exeter (which also match my boots, happy days!) - 

In fact, I do love the amount of "vintagy" of this cape - enough to feel a little special, not enough to feel fancy dress. I went into a vintage shop in Birmingham yesterday and the woman in the shop was so excited about my cape she put the phone down on her daughter to ask me about it! Obviously this woman has spectacular taste!

The only downside to the cape is that you can't wear a handbag on your shoulder. You can, technically, but it looks strange. But you can wear it on your arm, like a lady :)


So onto the details. The pattern is the Fairy Tale Cape, a "you choose the price" pdf pattern by Charlie at This Blog Is Not for You. She's also recently released lovely dress and skirt patterns that are definitely worth checking out! The instructions that you download for the cape are quite brief but she's done full tutorials on the blog for lining the cape and adding armholes, as well as drafting a collar. I did find I had to write out lists of what order I'd do things in as there's no set order given but it's pretty simple to figure out.

I'd originally planned to do a hood rather than a collar, but when I sewed it on it looked absolutely ridiculous. Firstly, the hood on the pattern is a very exaggerated floppy hood, which I should have known wouldn't work with a heavy wool. Secondly, in this heavy, beige, almost hessian-looking fabric it looked horrifically like some kind of medieval costume which was NOT the look I was going for. I swiftly unpicked the hood and drafted a collar which I really just should have done in the first place! 


I bought 2.5m of this heavy wool from Simply Fabrics in Brixton as I wasn't sure how much I needed and couldn't get signal in the shop to check. I only used about a meter and a half of it, so there might be enough to squeeze out a matching skirt at some point! For the mere price of £6 a meter I expected a wool blend but a burn test suggested it's 100% wool. Win! The fibre really makes this cape work - it's lovely and warm even at my 6am commute on the bitter days we've recently had.


The lining actually cost more than the wool, but was worth it for the right colour which proved very hard to find. I bought this lovely gold satin in Barry's in Birmingham for £7 a meter. The buttons are coconut wood, from Wool Warehouse, which anyone who knits should check out immediately as it is simply the best wool shop I've ever come across. I also found this gorgeous dress clip in a charity shop which I think looks lovely clipped onto the collar. :)


A lot of friends have been asking recently if if costs more or less to make your own clothes than buy them and I always tell them it depends what you compare it to. If you normally shop in Primark, H&M, and New Look then probably not. If you normally shop in Topshop, Oasis, and Warehouse, then there's definite savings to be made, but it really depends on the quality of fabric you buy, and to a large extent where you shop for it. The total cost for this cape came to about £35, which is pretty much on the budget I'd planned for this item, and certainly less than I'd pay for a wool cape on the high street.

Monday 17 November 2014

Announcing the May Sewing Retreat!

Yesterday, I met up with sewing buddies Lindsey, Charlene, Janet and Caroline and we were chatting about the various sewing retreats going on (mainly in the US) and how much fun they sounded. However, I know I'll never go on one of these trips for one main reason - the cost.

I'm sure there are plenty of events like this in the UK, but when I have seen them they are arranged as a class style event - where you go to learn a new skill or construct an item, so much of the cost goes towards tuition and the company's organisation of the event. We thought, what if just a group of friendly sewists got together, hired a not-so-little cottage in the countryside for a long weekend and had a little sewing vacation together? And it was totally affordable?

Let me paint a picture for you - you arrive at a quaint country house full of people who love sewing as much as you do, you get to know each other over dinner and a few drinks before turning into bed. The next morning we all have breakfast, go for a walk in the nearby woods and then return to the cottage for a full day of social sewing - sharing ideas, inspiration, techniques, and tales of the time that zip just wouldn't go in! We stop for a quick lunch, then crack on with the sewing. We'll have various stations for cutting and sewing, and perhaps a few souls hand hemming in front of a cheesy movie in the living room. In the evening, we take turns cooking our favourite meals (and maybe a few cheeky desserts) and just chill out. Feel free to pack knitting/embroidery/small projects to work on while we chill :). And then on Sunday, we do it all over again, before going our separate ways on the Monday with a handful of finished items and a bunch of new friends. Depending on where we end up staying we could even scope out the local fabric shops before heading home!

I'm already tracking down a suitable location with extra large tables, sofas for all, and plenty of plug sockets!

The Details:

Dates: I'm looking at the first May Bank Holiday; Friday 1st - Monday 4th May 2015. Attendees can arrive during the day or after work on the Friday, and we'll head our separate ways after lunch on Monday.

Location: I wanted to make it as easy as possible for as many as possible so I'm looking at the South region, probably the Cotswolds, as I appreciate many of you guys are London, Midlands or just "South" based. Sewists from the North and beyond are of course most welcome if you don't mind the extra travel :).

Cost: I've already scoped out a few places to get in touch with depending on how many people are interested, but the average costs for 3 nights will be around £100 to £130 per person for the venue, plus expenditure for food, drink, etc.

Equipment and materials: you'll need to bring your own sewing machine, fabric, tools, and whatever else you need for your makes. We could also do a fabric and pattern swap if people are keen as well.

So if a long weekend of sewing, socialising, eating great home cooked food, a few cases of wine (let's be realistic) and walks in the woodlands sounds appealing to you, please get in touch! Send me a message on jodiesadventuresinsewingland@gmail.com, or leave your email address in the comments. Once I have an idea of how many are interested I'll start contacting venues and will provide further details from there.


Sunday 9 November 2014

A grey, wintery Zinnia

I want you to know how much trouble I've had to go to in order to get this post up tonight as promised. I took some photos ages ago but looking through them I realised just how hideous they are so decided to grab the tripod. For this, I had to do my hair and make up (hassle!) and I even burnt my hand helping Chris cook dinner after he burnt his hand cooking it (dinner had better be good - it still stings pretty bad!) but I prevailed!! I WILL blog! But with some miracle I managed to get a few photos in the time it takes to play Michael Jackson's Thriller. Good stuff!


So, this is Zinnia number 3. It's basically just an awesome skirt - it's a modest length for both work and cycling, it's fairly flattering even after big dinners and it goes with practically everything. I imagine as my current Zinnia's wear out I will continue to make more for many years.


As part of my AW14 plans I decided a grey, heavier weight skirt would be a good addition to the wardrobe and as usual I had a lovely luxurious fabric in mind and then spotted a bargain on the market (story of my life) and grabbed that instead. It's still a pretty decent fabric though - from the brummy rag market - I did have to battle out with another lady for it though as though was only three meters left and she had her beady eye on it also. Luckily she decided it was too expensive at £2 and let me have it (I later found her at the 50p/meter stall snapping up a few meters of fabric!).


For the price I expected pure polyester but the burn test suggests a good cotton content as well. Happy days.

It's a medium weight fabric which works lovely for the skirt as it behaves and presses well but there's a slight stiffness to it that gives it a great shape too.

You may also notice another new make here in the form of a Tilly and the Buttons Coco - but we'll come back to that one another time.


Construction wise I don't have much to say - all you need to get right is the waist measurement and the rest falls into place. I do find the waistband is too small though, and have had to cut a new one each time I've made this skirt. I'll learn.

I did decide to add another length of grandma's lace to the inside of the hem, just 'cos it's pretty!


Once again, I've tried to do a nice neat job - which is pretty easy on a skirt to be honest (much less potential for things to go wrong!) but I've had a couple of twisted button bands in the past which I wanted to avoid this time. I don't normally faff around with basting, but I'm glad I did this time.


Finally, a bonus photo of a Zinnia outfit I particularly love. Colour matching is the best!


Sunday 2 November 2014

Hawthorn no. 2 - Blue and white delight

So now we've seen the cheap, slightly rushed, polyester Hawthorn, I'd like to introduce to you this beautiful (there I said it) cotton lawn Hawthorn. I'm really proud of this dress, and despite being constantly told growing up that I should be more modest, I feel like I am allowed to chuck that out the window every once in a while.


I was naughty with this fabric as it didn't meet my SS14 colour scheme at all but it was so pretty and so cheap I couldn't leave it behind. I bought it in Simply Fabrics, Brixton whilst visiting for the By Hand London kickstarter bash. A lovely lady, Barbara, offered me a bed for the night so I could stay a little longer and meet up with some of the girls from NYLon14 the next day. I had some time to kill in the morning and Barbara recommended this shop not top far away. I'll definitely be going back! The fabrics are very good quality and a fantastic price, though the stock changes frequently with what he gets his hands on so it's very much a "pop in and see" kind of place.


This is a gorgeous soft, fine, cotton lawn and was just £3.99 a meter. They also stock liberty fabrics (normally discontinued rolls) at about £12 a meter. I adore the print on this fabric, and this kind of print will feature heavily in my SS15 plans (yes, I'm already thinking about it!).


So onto the dress! 
I wanted to do this dress better than the others. I wanted it perfect inside and out, and bar a couple of wonky stitches (where no-one will see) I'm really very happy with it. 

Would you like to see my insides?


The main seams are all French seams. The facings and waist seam are all bias bound in a soft white binding.

The sleeves are faced with the bias binding also...


...hand stitched down almost invisibly...


...and the hem, also hand sewn, is finished with a sweet blue and white lace trim my grandma gave me.


The best part of finishing everything so carefully is that I know this dress will last a long time. And I really look forward to wearing it summer after summer.


I bought 3m of the fabric which was 57" wide. Sadly I didn't record how much was left but I think it was just under a meter. I gave the rest to a friend who has just bought a house and the colours match her kitchen, so she wants to make some sweet things out of it. 

I also used 4 and a half meters of the bias binding and almost 3 meters of trim for the hem. It's amazing just how much length you can get through, and 3m of hem is a lot of work by hand, but it's so lovely to have an invisible finish. I used to really loathe hand stitching but now I enjoy the process knowing how much better the finish will be. I've also got a lot better at it than when I first started, which helps with the motivation!


My only issue with the dress is that it's a little loose around the waist. With all the bias binding on the inside it's not worth altering, but if/when I make another I'd probably lose an inch or so there.

I've promised myself to get back on the blogging train, and will hopefully be posting weekly from now on. I figured if I say this here then I can be held accountable if I don't! I still have plenty of finished items to share before I start struggling for content, so fingers crossed I can stick to it! 

Until then, I hope you've enjoyed my little Hawthorns :)

Wednesday 29 October 2014

Colette Hawthorn in Emerald

I have been a bad blogger. Sorry for the silence, it's been a busy couple of months with a new job, much much longer hours and a very tired Jodie. I do hope you'll forgive me, as I have many new things to share with you (I have found time to sew!).
Even though it's very much autumn now, I have a few summer makes to catch up on so let's start at the beginning.

This is the first of two Colette Hawthorn dresses I have to show you. I literally made one right after the other in the space of a week. Sorry for the poor quality photos, I have had a nightmare trying to photograph anything recently due to long working hours equating to little to no daylight :( the actual colour of the dress is a warm emerald, not the teal-y colour it appears as here. I wish I could show you the colour properly as it really is lovely!


This was the first, and one that's sat at the top of my projects list for ages not getting made for various reasons. The idea came from a RTW dress I saw in a shop a while back, it was a beautiful emerald/forest green satiny-feel dress with a button up bodice, gathered skirt, and 3/4 cuffed sleeves. It was lovely, and about £5 in the sale which I understood why as I tried it on. Not only had the buttonholes been sewn too small to get the buttons through (an easy fix with smaller buttons!) it just wasn't made to fit a human body. Seriously, it was wrong in so many ways, but on the hanger, really sweet. So of course I papped it and decided I'd make something similar.

I've loved the hawthorn since it was released and remembered how excited I got when I first saw it. Love at first sight. I don't know why I never made it sooner, I guess I hadn't got the right fabric in mind. I decided I would use hawthorn to recreate the dress I saw in the shop, and originally planned to make this with sleeves, then realised that polyester and plackets that need to be pressed well probably won't be friends. I also realised I lacked summer dresses, especially sleeveless ones.
So yeah, here it is.


The fabric was cheap, as usual, £4 a meter from World of Fabrics, Cheltenham. We were visiting for the afternoon and I'd convinced Chris to let me have a look in case they had this particular fabric I was after, and it was literally in the doorway waiting for me. Perfect. I also picked up the fabric for the By Hand London Victoria in that shop. If you're ever in Cheltenham I definitely recommend you visit. It's a huge shop with floor to ceiling stock that goes back deeper and deeper until you think there can't possibly be any more fabric in this shop! The range of dressmaking fabrics is huge, the owner knowledgeable and the prices are very reasonable, AND it's only a 5 minute walk from the centre of town. Do it.

So, back to the dress. I'll admit that I didn't put my all into this dress and took a few shortcuts to get it finished. I turned and stitched the sleeves instead of using bias binding - in my defence I couldn't find a close enough match and making my own from this fabric would have been a ball ache that I wasn't willing to put myself through. I also machine hemmed, a habit I thought I'd broke, but I didn't mind too much since I'd finished the sleeves the same way. So this is more a cheap and cheerful dress than a prized procession, but sometimes it's nice to have a mix of the two, right?


I bought these lovely pearly buttons in the Warwick Wools haberdashery for a mere 9p each, so the total cost of the dress was only about £14. I only used 2.2m of the 4m of 45" wide fabric I'd bought, far less than the pattern called for, but I intentionally over purchased as I'd like to make a simple top out of the remains. I'm considering printing a gold design on it too, and I now have the perfect stamp!
So, onto the fit - I cut a size 2 at the bust grading to an 8 at the waist and hips and the only adjustment I made was to the reduce the bodice length by 2". I noticed that this made the dart funny, so that it didn't meet at the bottom, so I readjusted the bodice piece to where I thought it should be. Had I added sleeves I'd have needed to do a broad back adjustment but sleeveless it was very simple to fit. I also cut the back skirt on the fold as the back seam served no purpose and it fit on the fabric. Made sense.


As for the pattern, I love it. It was really easy to fit, is very comfortable and easy to wear and I anticipate making a few blouse versions in spring as I love that sweet little collared neckline! 

Hawthorn no.2 coming soon!


Sunday 7 September 2014

Blog Hop


The very lovely Claire over at I Want To Be A Turtle has kindly nominated me for a Blog Hop. I don't know how long it's been going, though it would be interesting to find out!

Very simply, it's a way of exploring blogger's reasons and methods for writing via four questions.

Thanks Claire for thinking of me!


Why do I write?

I've always enjoyed writing as an outlet, but I decided to start a blog purely to join in! 

After sewing small things around the home for a couple of years I decided to try my hand at clothes, and it was the discovery of Colette Patterns that played a large part here. I saw the patterns in a shop, fell in love with the Peony dress (ironically, I've never made it!). Knowing I'd need some help to make the jump to clothing, I bought the Colette Handbook and started teaching myself, then through the flickr pool discovered just how many other women all over the world were making their own clothes. I was amazed and intrigued, and found myself searching the internet and looking at hundreds of versions of a pattern before I made it, just absorbing ideas for fabric choice, colour, details, construction and fit tips, and so on.


This tool was so valuable when I was starting out, and is still so valuable to me today. I decided to start a blog so that I could add to this online search tool. Maybe my makes could help others choose which patterns to make and how they might make it? I wanted that pool of ideas to be as large a possible, and it would be selfish of me to deny others details of my projects, right!?

On top of that, it's a lovely record to have. I keep notes anyway, but it's more the emotion behind it that is captured on the blog. I might remember how much grief that zip gave me, but I'd probably forget the satisfaction of finally getting the fit right after three muslins. It's also good to come to if I'm struggling with a project - to remind myself of what I can do when I feel hopeless.

And I am so glad that I started blogging and following other sewing blogs or I wouldn't have met all the wonderful people that this network has to offer. It's rare that I meet people who I instantly click with, but I have met a LOT of them through blogs. Sewists are just the nicest people!


What am I working on?

I have a mostly finished Kitschy Coo Lady Skater on the sewing table. The bodice is far too long - everyone said this but it seemed OK until I added the weight of the skirt. I'll learn to listen one day. This is my first adventure into stretch sewing and so far it's going well! I'm taking my time, but I'm happy with the results so far. Once I've shortened the bodice it's just the sleeve cuffs and hem to do.


Next up is a handful of Sorbettos, at least one Deer and Doe Bleuet, and a cape!!! I came across this ace pattern from Charlie at This Blog Is Not For You a while ago and can't wait to make it.

I'm also dabbling in underwear, and have been testing out some stretch lace knickers using this really simple free pattern by Deby of So Sew Easy. I'm looking to try a few of of Ohhh Lulu's beautiful patterns soon, and may try my hand at bra making if I can find the courage (it sounds complicated, doesn't it!? Where do I buy all the little notions?)

How does it differ from others of it's genre?

Honestly, I suppose it doesn't. But that's okay, as it was never my goal to stand out or do anything different. Like I said before, I started a blog in order to contribute to the amazing online community, and I think the more people write about their makes and share that inspiration, the more creativity and ideas others can gather from them.

How does my writing process work?

I make notes of each project as I go. If I remember, I try to measure all fabric and trims before I start so I can see how much is left over to calculate the actual usage, in case I wish to make another. I note pattern adjustments, variations from the original pattern, anything I struggled with or would do differently next time. Some of these make it to the blog if I think people will find it interesting.


I wish I could say I was organised with my writing but that would be lying. It normally goes like this...

 - finish garment
 - want to wear garment right away but can't think of good place to photograph so just wear it
 - keep garment in washing basket for a week
 - wash garment, think I should definitely photograph this soon but I'll wait until the weather is good
 - give up and photograph it indoors or trick boyfriend into taking some photos on a day out until I have a few I can use online

I can't write until I have the pictures for some reason, and as soon as I have the photos I have to write STRAIGHT AWAY and get it online, normally because it's taken so long. I currently have 2 dresses, 2 skirts, and a jumper waiting to be photographed and blogged. Shameful. 

Who's next??

So, time to pass the baton!

Both of my nominations are lovely girls who I met at the NyLon14 event in London back in may, and have met up with since for (can you guess) fabric shopping! 


Firstly, we have Charlene of One Year, One Wardrobe who is blessed with the talent of knowing exactly what suits her, and sewing the hell out of it. Check out this gorgeous Elisalex that looks like it was made just for her (funny that!).


Secondly, we have Lindsey of French Seams and Pipe Dreams who has a great eye for fabrics. All of her projects have clearly been well thought out, I particularly like this navy/white geometric print she used for a top before hacking into a Brigitte scarf after a little scissor mishap (we've all been there).

Saturday 9 August 2014

Colette Mint Truffle

Who doesn't love a mint truffle?


This was a loooong project in the making. I originally planned to make this dress for my brothers wedding, LAST spring. Then I moved to Warwick, bought this gorgeous spearmint coloured chiffon for £7/m in Royal Fabrics, Leamington Spa, and then never made the dress until now.


I had quite some trouble finding a suitable lining. The pattern calls for the bodice only to be lined and recommended a structured fabric, so I bought some similar coloured cotton before realising that the skirt would be entirely see through - obviously!!

I then bought some white *stuff* in Harlequins, also Leamington Spa, not sure what it is but I bought enough to line both the Victoria jacket and Truffle skirt for a lot of money before realising I didn't want to use that either, for either project. The challenge was in the drape: structured enough to hold the bodice together, but drapey enough to compliment the skirt. Using two different linings was an option, but colours like this are hard to come by, let alone in two different weights.

Eventually I found this funny fake silk at a market in Leicester. The guy told me it was silk, then told me it was like £3 a meter and I quickly questioned the fibre. It's a lining fabric similar to the nasty acetate stuff, but drapier, and less vile feeling. I still feel like I settled with this lining, but the colour was a great match and really brought out the green of the chiffon so I went for it. It's cheap but not unpleasant feeling. It didn't pass the burn test. But the chiffon is polyester too so it really doesn't matter.

Fitting the dress was a breeze, and the making was easy enough until I tried to attach the lining to the zip, which just wasn't happening, so I put the whole project aside for about a month, annoyed. I eventually picked up the project again and slip stitched it by hand in front of a film one night.


So, I lined this normally, but in hindsight I definitely should have underlined it. All the darts and seams are visible through the chiffon, and don't always sit directly above the also visible lining darts. Silly Jodie. You can see what I mean much better from the back -


Oh well.

I actually finished this about a month ago, but haven't had a chance to take photos as I haven't actually worn it yet, nor had a buddy for a photoshoot, but this morning I woke up at 6am and it was sunny and lovely and I just thought I'd get dolled up and take my tripod to the park. And that's what I did. I took a few tips from Rachel at House of Pinheiro, so thanks Rachel for that! Need to fix that washed out sky though. Any advice guys?


Taking photos in the park with a gorilla pod (because I left my tripod in Chris's car, whoops) was really quite hard! It was too bright in the sunlight so I had to find shade, and also had to find something to attach the gorilla pod to. Eventually I found this railing by the river, after some other unsuitable locations. Check out my gorillapod in action!


I really thought I'd stretched out the neckline, but looking at the photos it looks fine, I think I expected the sleeves to sit closer to my neck? But how pretty is the skirt drape!? I love this feature, it makes an otherwise very simple dress totally lovely.


Breezy! I did all the chiffon hemming by hand, using this brilliant tutorial on doing a rolled hem by hand, and all the seams are finished using my newly discovered mock-serger stitch, which doesn't have the best results on fine fabrics, but it did the job. I did accidentally sew the lining hem on the outside, so will fix that in the near future.


Whilst I don't think chiffon was on the list of recommended fabrics for this dress I think it worked really effectively, especially with that skirt drape. Next time I will definitely underline though.

Finally, check out my new "goes with absolutely everything" shoes! It took me a LOT of online browsing to find these, and they were an absolute bargain too, and comfy enough to wear all day :)


Sunday 27 July 2014

By Hand London Anna - Purple maxi

I am so happy to share this dress with you, as I absolutely LOVE it! Which is so weird considering when I first saw the Anna dress I thought "It's cute, but it's not for me". How wrong was I?! Eventually I started seeing pretty dresses and thinking "oooh what pattern is this.... Anna? But I thought I'd decided I didn't like it". Fool.


So this is Anna number 2, made much sooner than I had planned to make another, but it was one of those makes that starts with the fabric. I bought this at NyLon2014, on Goldhawk Road, saw this beautiful drapey purple poly for just £2 a meter, and instantly started asking everyone around me what I could make with it (I have a (loose) rule that I can only buy fabric if I have a plan for it). Some genius suggested a maxi Anna, and that was that. I'm very sorry I can't remember who made that suggestion, the whole day was a bit of a blur! But I bought 4m for £8 (WIN!) and then spent £4 on the zip (ugh, stupid overpriced invisible zips) and off I went. The fabric is polyester, but it's like a faux silk in texture and weight. I literally squeezed it into the 4m as it was a little bit narrower than I'd bargained for at 42 inches rather than 45.


Hey cat!

And of course as soon as I got it home I wanted to make that dress. I had a wedding in July, it seemed like a good idea to bump it up the queue!

Despite this being my second Anna, it was not without it's problems. This was all my own fault, but I'll learn eventually. Firstly, I learned the hard way to not forget to trim the inner seams when french seaming:


And I also learned that I should apply any changes I make to the paper pattern ready for next time. Last time, I did the cheats way of fixing a gaping back, but I didn't alter the paper pieces. After fixing my gapey back (poorly) I ended up with this mess:


Oh the shame! The zipper no longer reached the top, so what you see here is where the zipper tape literally ends at the top of the dress. I thought "ahh I'll just pop in a hook and eye and noone will notice. What do you think? Totally nailed it right? :s

Luckily I was part way through a very successful Colette Hawthorn when I did this adjustment, and was enjoying a sewing skills confidence boost, so I took a deep breath, told myself that I am an amazing seamstress and I CAN fix this, poured a rather large So Co and lemonade and I did fix it - redoing the zip in front of The 100 (is anyone else hooked on this?). 

See - fixed :)

Anyway, I debuted the wearing of the dress at my friend Lydia's wedding in Taunton. Sadly I didn't take any photos at the event, but I had a little self timer party in the garden of our B&B. 

The only alterations I made since the first one was to lower the neckline by an inch, and extend the sleeves about 2 inches - I did a narrow shoulder adjustment first time round which took away a lot of the sleeve length and I wanted to add a little back. I also did a rolled hem by hand which took FOREVER but was definitely worth it as it's practically invisible. Now that I sew I can't help but inspect the finishing of other people's shop bought dresses, and was sad to see how many fine fabric dresses at the wedding had been machine hemmed, in that obvious machine hemming way. I guess they don't notice it though, so it wouldn't bother them.


I'm now wishing I took some side view photos so I'd look slimmer. Oh well. 


Sorry for my angry pouty face here - I just thought it was a good shot of the skirt!


I received many lovely compliments about the dress at the wedding, some from those who know about my sewing obsession and some from complete strangers. And even though this dress is miles away from what I normally wear, I absolutely love it, and can't wait to find an occasion to wear it again!